Professional Wallpaper Installation Guide
Exceptional wallpaper deserves expert installation to reveal its full beauty. Between meticulous preparation and precise techniques, professional installation transforms a simple covering into lasting decorative excellence.
The quality of the surface determines 80% of the final result. This technical reality requires rigorous preparation where every detail matters. Perfectly prepared walls guarantee not only flawless aesthetics but also maximum durability of your decorative investment. Mastering these professional techniques ensures that the brilliance of your walls withstands the test of time without deterioration.
Surface Preparation: The Foundation of Excellence
The golden rule of professional installation requires clean, dry, sound, smooth, and uniform walls. This technical specification is non-negotiable: every surface imperfection will inevitably affect the final appearance, creating visible irregularities and compromising long-term adhesion.
Preliminary inspection often reveals microcracks, rough spots, or traces of old coverings invisible to the untrained eye. These imperfections, however minor, create weak points where moisture infiltrates and detachment begins. Professional preparation anticipates these risks through thorough diagnosis and appropriate treatment.
Surface Diagnosis and Treatment
Wall Condition Assessment
The technical diagnosis always precedes intervention. This crucial phase determines the necessary treatments and conditions the success of the installation. The expert eye immediately identifies common pathologies: friable plaster, moisture marks, shrinkage cracks, adhesive residues.
Adhesion and Cohesion Testing
The grid test reveals the cohesion of the existing plaster: cross-cut incisions with a cutter followed by tape removal. If particles detach, a hardening treatment is required before any application. This simple protocol prevents premature detachment due to a defective substrate.
Moisture Control
A moisture meter detects at-risk areas where residual moisture would compromise adhesion. The moisture level must be below 4% to guarantee lasting installation. Beyond this threshold, a drying period is required, potentially accompanied by moisture-resistant treatment.
Technical Surface Preparation
Technical preparation transforms an ordinary wall into a professional substrate ready to receive wallpaper. This decisive phase determines both the final aesthetics and the durability of the installation.
Degreasing wash eliminates all traces of pollution: nicotine, cooking grease, fingerprints, adhesive residues. This operation uses specialized detergents that dissolve greasy films without damaging the substrate. Thorough rinsing removes all detergent residue that could compromise subsequent adhesion.
Filling and Smoothing
Wall imperfections require meticulous filling with compounds suited to each defect. Cracks, anchor holes, and scratches are specifically treated to achieve a perfectly flat surface. Final sanding eliminates any excess thickness and creates optimal roughness for wallpaper adhesion.
Applying a specialized primer standardizes substrate absorption and optimizes adhesion. This step, often neglected by amateurs, nevertheless ensures exceptional durability. The primer also regulates porosity, preventing absorption variations that would create visible color differences.
Cutting and Pattern Matching Techniques
Professional Cutting Mastery
Cutting determines the final aesthetic quality and affects installation ease. This technical operation requires precision and anticipation to avoid costly errors on quality wallpapers.
Precise measurement systematically incorporates a 10 cm safety margin in height, distributed between top and bottom of the strip. This allowance compensates for ceiling height variations and facilitates final adjustment. For panoramic wallpapers, this margin becomes critical to guarantee perfect visual continuity.
Pattern and Repeat Management
Straight matches require millimeter-perfect positioning where each strip exactly reproduces the decorative sequence of the previous one. Registration is performed at the reference pattern, generally the most visible or most structural element of the composition.
Drop matches complicate cutting by requiring a half-pattern offset between adjacent strips. This configuration, common on geometric wallpapers, optimizes decorative effect but significantly increases waste and installation complexity.
Advanced Installation Techniques
Professional Application Method
Professional installation follows a rigorous protocol that eliminates the risk of error and guarantees flawless results. This methodology, refined through experience, optimizes every movement for maximum efficiency.
Initial Marking and Positioning
The vertical plumb line constitutes the absolute reference for installation. Marked with a chalk line or laser, this guide directs the positioning of the first strip and determines the alignment of the entire surface. Initial error would propagate across the entire surface, irreparably compromising the result.
Positioning is performed from top to bottom, allowing the paper to overhang the ceiling by 5 cm. This method avoids excessive tension that would distort the wet covering. Lateral adjustment is made by gentle sliding, without stretching or compression.
Smoothing and Bubble Elimination
Professional smoothing progresses methodically from center to edges, following a chevron movement that effectively expels trapped air. The pressure applied must be firm but measured to avoid overstretching that would create deformations after drying.
Persistent air bubbles are treated by micro-perforation with a needle, allowing air evacuation without compromising the covering’s integrity. This delicate technique requires expert touch to avoid visible tears.
Managing Obstacles and Complex Cuts
Technical obstacles – electrical outlets, switches, radiators – require millimeter-precise cutting that preserves decorative integrity while ensuring installation safety.
The paper template technique allows exact transfer of each obstacle’s shape and position onto the wallpaper. This method, slower than direct cutting, virtually eliminates any risk of error on expensive wallpapers. The template is cut from kraft paper and adjusted perfectly before transfer to the final covering.
Cutting Outlets and Switches
Cutting electrical fixtures is always performed with power off. The opening is made with a cutter from inside to outside, precisely following the fixture’s contour. A 2 mm margin allows for paper expansion while remaining invisible under the finishing plate.
Corners and recesses require a specific technique avoiding excessive tension. Cutting is performed by successive slits that release constraints and allow perfect adjustment in complex angles. This method preserves the covering’s integrity while ensuring flawless aesthetic appearance.
Finishing and Quality Control
Detail Refinement
Professional finishing transforms correct installation into exceptional work. This final phase reveals expert craftsmanship and guarantees the aesthetic longevity of the whole.
Trimming excess is performed with a guided cutter, in a single pass to avoid visible touch-ups. The perfectly sharpened blade cuts cleanly without tearing or fraying. This delicate operation determines the quality of baseboard and ceiling joints.
Cleaning and Protection
Immediate cleaning of adhesive traces prevents their permanent drying, which would compromise the final aesthetics. A slightly damp sponge removes smears without damaging the covering. This intervention is performed strip by strip to avoid residue accumulation.
Temporary protection of traffic areas preserves the installation during complete drying. Plastic film or cardboard effectively protects against splashes and accidental handling during the critical 48-hour stabilization period.
Final Inspection and Quality Guarantee
Methodical inspection of the installation reveals any correctable defects before complete drying. This systematic verification examines seams, adhesion, alignment, and overall cleanliness. Minor corrections are made immediately, avoiding complex later repairs.
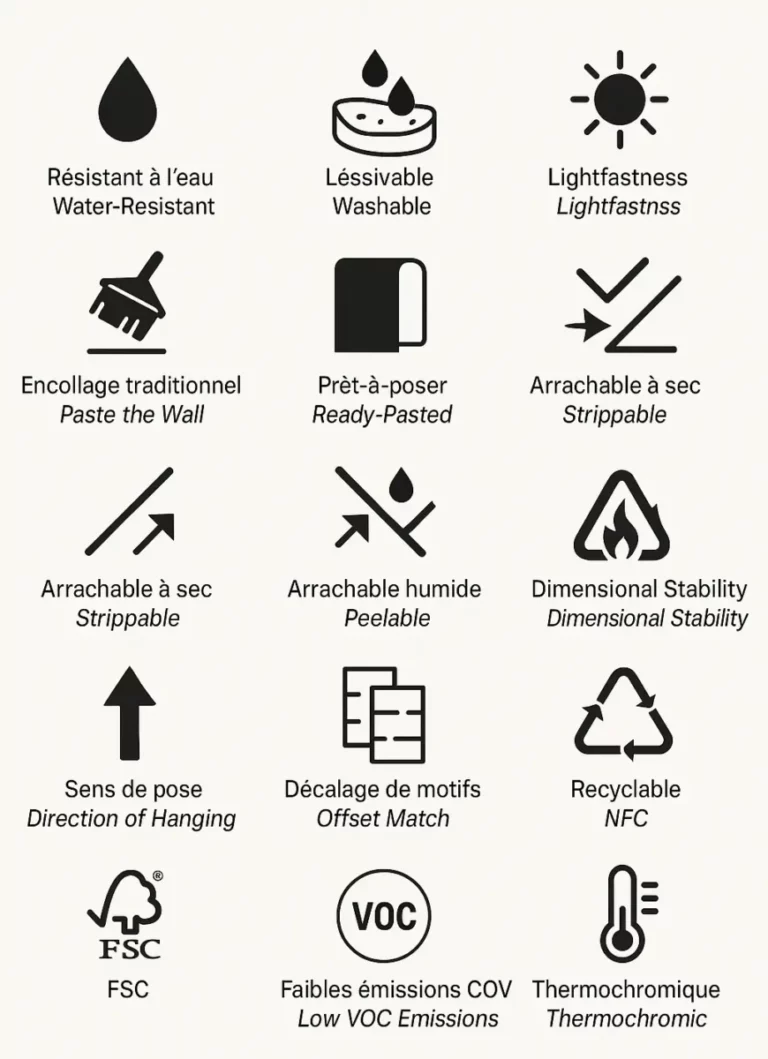
To identify specific maintenance requirements and extend your installation’s lifespan, consult our technical symbols guide which details maintenance recommendations for each substrate type.
The professional installation guarantee relies on scrupulous adherence to these technical protocols. This proven methodology ensures lasting results that will preserve the beauty of your walls for many years, fully revealing the exceptional quality of premium wallpapers.

Digital entrepreneur and craft artisan.
My work bridges craftsmanship, design history and contemporary creation, shaping a personal vision of luxury interior design.
Since 2012, I have been based in my workshop on the shores of Lake Annecy, creating bespoke interiors for architects, decorators and private clients.